Saturday, March 29, 2014

"The Connoisseur": Rockwell and Pollock


Comparing compositions of two different artists is one of my favorite things about teaching art. I have posted before about this lesson, and it is such a good one I am happily posting again with this year's second graders. American painters Norman Rockwell and Jackson Pollock seem to have nothing in common - Rockwell was narrative with a skillful, realistic technique and Pollock, aka "Action Jackson" was an abstract expressionist bursting with energy and movement. Pollock died young and had a limited number of completed works, while Rockwell had a long career and many many works. However, they both were born in the early 1900's and lived in the northeastern part of the U.S.; they also worked in old barns converted to studios. They both painted on large canvases, although Pollock's were rolled on the floor and Rockwell's were painted on an easel.

Rockwell made a painting called The Connoisseur in 1962, showing an art critic or collector at a gallery, taking in a painting resembling the drippy, splattery style of Jackson Pollock. My second graders put themselves in the shoes of this art expert, posing in a thinking pose and shooting pics of each other for our renditions of this iconic image.

We tried out both artists' styles, first creating a Saturday Evening Post cover imitating Rockwell's Triple Self Portrait, 1960, and then working at a 4-part action painting station. Students shared their thoughts on which artist they preferred, and the majority said they liked both for their own unique qualities, making our "mash-ups" all the more meaningful.

Blue Poles, number 11, 1952


Thursday, March 27, 2014

Folk art in Georgia

Each year, my first graders learn a little about folk artists from our state such as Howard Finster and Nellie Mae Rowe. We learned that they came from very large families, lived and worked on farms, had little or no schooling, and taught themselves to make art. They often made pictures of farm life, because it was familiar to them, and they used materials they had on hand rather than buying art supplies at a craft store. Quilting and sewing are also important in folk art - and old clothing and fabrics become repurposed for these. Here are some of our folk art paper quilts and our stitchery. We were proud to learn to thread needles and create stitches!

Saturday, March 22, 2014

Free Art Friday workshop 2014


Today I was lucky to attend a workshop for art teachers that was given by four Atlanta artists who participate in the Free Art Friday movement, which celebrates creating, collaborating, and sharing art in the local and global community. Last year, our school also participated and you can find that info HERE - http://dolvinartknight.blogspot.com/2013/05/finally-free-art-friday.html and  http://dolvinartknight.blogspot.com/2013/05/what-show.html
We are looking forward to participating again this year, and art from Evereman, Sad Stove, Ms. ATL, and Crazy Monkey Trucker will be up for grabs, free to the finder, around our building on May 9! Stay tuned for more info!

Sad Stove: 

Evereman: (with my husband and son on wood branding duty)

Crazy Monkey Trucker:

My daughter Kinsey with a variety including some by Ms. ATL


Friday, March 21, 2014

Collection Jars, Kindergarten

 This is the time of year when my students choose their favorite work from the year to show at our year-end art and music extravaganza, Fine Arts Night. For my youngest students, I meet with them one-on-one to make a good selection and help them create a title. When I ask them what they want to call their favorite piece, a few of them have titles ready, some just look at me blankly, and a few say something like "Elsa!" when it is clearly a picture of a  city street or something. :) So this planning time together is nice, but how do I engage everyone else as I make the rounds?
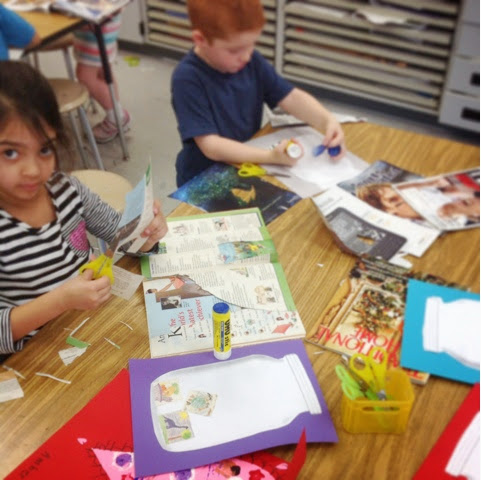
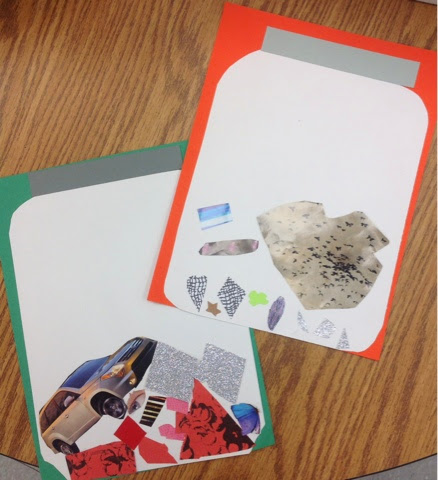
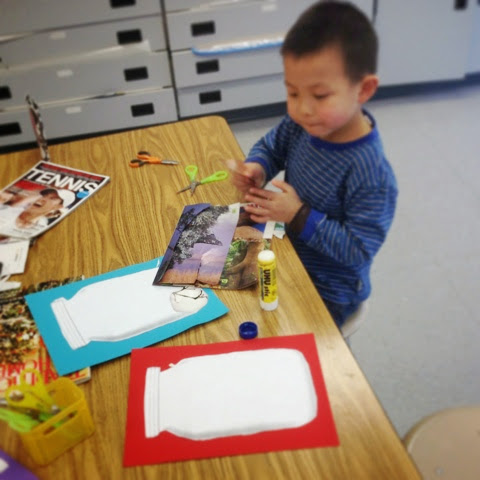
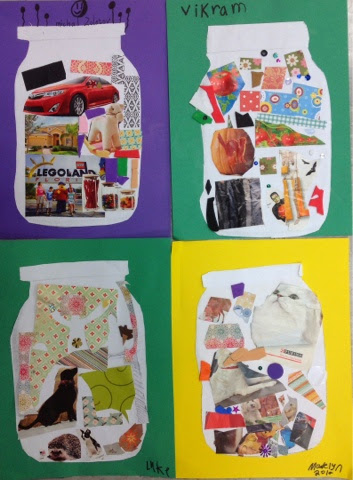
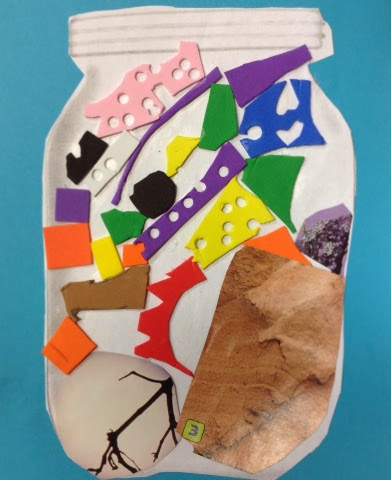
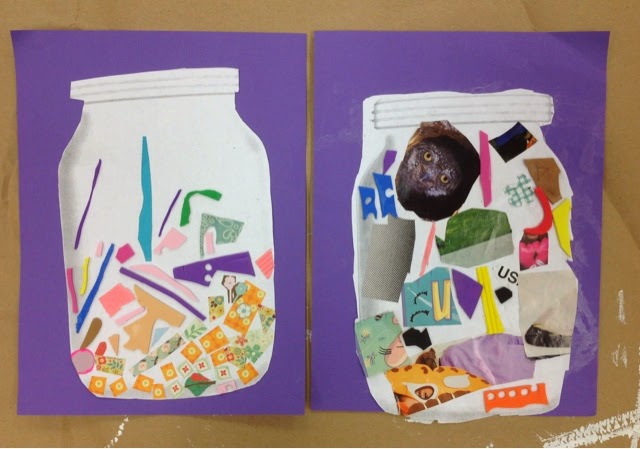
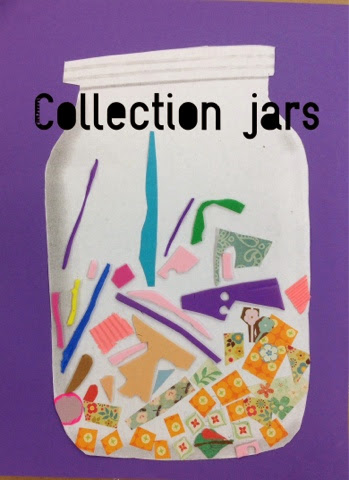
It's also the time of year when we are snowed under with scraps of all kinds. I had seen an image on Pinterest of a collage-y jar filled with beautiful paper scraps, very professionally done, and it stuck with me. The kids love digging through scrap boxes and looking through magazines, so I loaded them up and asked them to find a collection of things that appealed to them because of their shape, color, texture or just because it was an interesting object. They had a ball and it was great cutting/gluing practice. Some classes made their own jars, and a couple of my classes had a sub so I made a shortcut for her and printed out an empty jar for the kids to start with.
There is something fun and playful about this that I really like, not to mention the good techniques practiced and the use of lots of otherwise thrown out materials.


Beginning stages - we started at the bottom and imagined how things would drop into the jar.


I think all these need is a little shot of silver Sharpie on the lids!


Thursday, March 20, 2014

Our Rooms, 4th grade


Fourth graders completed a drawing of a room interior of their choice and put themselves in the picture by adding a self-portrait. We watched this video to get us ready and get some good tips about vanishing points, parallel lines and converging lines. http://m.youtube.com/?reload=2&rdm=11r6rr5nz#/watch?v=yEymIyLbiAI


Friday, March 14, 2014

Mosaic Collographs, 3rd grade


For several years, my third graders have explored collograph printing by creating snowy evergreens. Our timing didn't quite work out this year for that theme, but we may have topped ourselves with our texture mosaic collographs - they are really outstanding, if I do say so myself! We had lots of craft foam scraps leftover from our Calder sculptures, and I had a few rolls of really old corrugated border that was a similar thickness as the foam. We used the contrasting textures to create nonobjective mosaic designs, where we found shapes that "fit" together, but without touching:


Next, we prepared a couple of printing sheets by gluing some dark construction paper scraps together to contrast with the white ink I bought (originally for snow!). I knew that the kids would start to cut their background shapes really small, so to avoid that I gave them a strict 5 minute time frame to get their scraps cut and glued, and then I did my printing demo and they realized the background shapes weren't really important, it was just a pop of color! Every student had great success and the results are very artistic - they remind me of a piece of clothing I had back in the 80's with geometric and organic shapes scattered about (Esprit maybe, 80's kids?) Ha - it was like a flashback when I pulled my first print - gnarly dude!


Here is a pic of our printing setup - the kids' printing papers are under the table mat to keep them from getting inked until the right time.